While we sit here idly in St Martin, mulling over where to spend New Year's Eve.... here is another installment about some of the work/changes we've done to Saralane.
Transom and Bridgedeck
I’ve represented Outbound Yachts for more than 10 years and
have come to appreciate the features of the Outbound 46. That design has some
features that just plain make sense and we wanted to incorporate them on
“Saralane”. One feature is a “walk
through transom” from the cockpit. Back in the 70’s no one would consider a
walk through cockpit, but times have changed. We had side gates in the
lifelines to board from the dock, but for swimming, there was a fold down swim
ladder on the transom, and one had to climb over the stern rail too – very
awkward. Also, the side gates were used for getting in and out of the dinghy
and the result was that the gate stanchions took big loads when climbing
aboard. In fact the deck structure
around those stanchions was cracked and soft. Easy access via the transom was
the solution. Another change we wanted to make was to eliminate the bridgedeck
and create a three step companionway – to make passage in and out of the cabin
easier and improve the “flow” between the cockpit and below deck. Our new/old
C&C 40 had both a full transom and a bridgedeck with a 5 step companionway.
What to do??? SAWZALL!
 |
| Sawzall is our friend |
 |
| Hmmmm... |
 |
| Going for it! |
 |
| Confidence!! |
 |
| No Turning Back |
 |
| Yikes!! |
 |
| Garden Ornament? |
Cutting was easy, but structurally re-building the transom
to take rigging loads presented a challenge. While making one of my numerous trips to the dumpster, I saw that
someone had tossed the better part of a roll of stitched E-Glass fiberglass
cloth with chopped mat backing (expensive and perfect for the structural repair
we were about to make) and many useable scraps of biaxial fiberglass for the
job too. The bridgedeck would require
structural consideration as well, and both would need a lot of fairing and
smoothing to look right.
 |
| Just a five minute job! |
After measuring twice (or thrice) I marked out the cut line,
put a sharp blade in the Sawzall and cut out the transom without looking back – yikes!
Originally there was a single centerline backstay which now fell exactly
in the void I created with my cutting. I
planned to put a bridle on the lower portion of the backstay, so now I had to
reinforce two areas on either side of my cutout to bolt SS chainplates and
attach the backstay bridle. I designed these areas to be below the level of my
lowest cut so the tensioned backstay would not “collapse” the transom where I’d
cut it out. Reinforcing pads of ¾”
marine ply were epoxied in place on the inside and then glassed over with
multiple layers of the structural fiberglass.
 |
| New split backstay arrangement and extended swim ladder |
 |
| Chainplate detail |
While I had access to the inside
of the hull aft, I glassed in a new 2” engine exhaust tube through the transom,
and port and starboard drain manifolds (above the waterline and thus eliminated
two more big through hull fittings) to handle cockpit drains, scupper drains,
and bilge pump drains. I also installed a small independent drain for the
propane lockers. While easily accessed, I plumbed all of the drains and put in
a new engine exhaust hose with an elevated emergency shutoff.
The voids created by the transom removal were patched with
flexible plywood (epoxy coated) (1/8”) on the sides and the floor was ½” plywood.
I matched the existing molded radius with PVC tubing. All seams were taped with fiberglass and then
all surfaces were built up with numerous layers of fiberglass cloth and epoxy.
Finally there were many applications of epoxy putty which were sanded, and the
process repeated over and over until the surface was paintable. After painting,
I made a 10” cutout port and starboard and installed removable screw-in
inspection ports to service the bits of plumbing (and hose clamps) inside.
 |
| A Big Step Over |
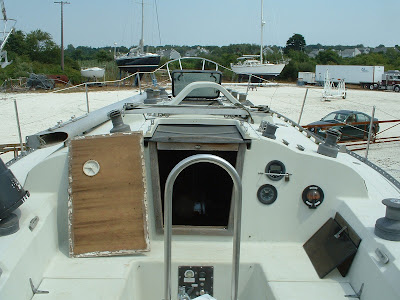 |
| Original Deck molding |
 |
| Old Companionway from inside - many steps |
 |
| Framed in new area |
 |
| Rough Cutout |
 |
| Sand and fill, sand and fill, repeat... |
 |
| Easy Access! |
 |
| New Companionway from inside - 3 steps! |
Most satisfying of all is that after nearly three years of constant
use - and some serious sailing - there are no stress cracks and nothing has
moved!
 |
| Start to finish |
Another great Outbound idea is a stern rail that wraps
around the stern and extends forward past the cockpit – this gives a solid
handhold when entering/exiting the cockpit. Our old rail wouldn’t work with the new transom anyway, so I bent a
template (starboard side) from inexpensive electrical conduit (Home Depot) and
wooden dowels (really) and took it to a stainless welder we know, along with
the necessary 1” SS tubing needed for the job. I just happened to have enough
½” SS tubing for the lower rail from another project. I asked him to match the template in SS and
also make a mirror image rail for the port side. We were afloat by the time he
was done, but everything was close enough that we installed both sides from the
dinghy!
 |
| Old Stern Rail without stern gate |
|
 |
| New rail extending forward past cockpit - much safer! |
 |
| New Stern rail with aft gate opening - again much improved background scenery |
While we had his attention, I had him extend our hinged swim
ladder a step, which he did with leftover tubing. Last season we added treads to make it a bit
easier on the feet.
These two big fiberglass jobs have made the biggest
“livability” difference on board “Saralane”. No more “up and over” to get below, and climbing back aboard from a swim
or the dinghy is now easy.
Happy New Year Everyone!!!


5 comments:
You are a very brave man.
Very impressive upgrade and moderization.
Another great post Skip (don't worry, yours are still the best Maddie) and this one reminds me of what I do as a designer. I often take an existing property and look at it from a strictly practical standpoint. Do you have to go up a couple steps only to go back down a couple steps further down the path? Stuff like that. It's very satisfying to simplify a design and make it more fuctional. Nice work.
Congratulations, Skip! I am amazed that you do all that! Beautiful work!
Happy New Year to you and my sweet Maddie!
xoxoxoxo
Kim
I guess that more than 40 years of sailing experience would make you knowledgeable about what works and what doesn't. I note that you're not too proud to acknowledge some of the great Outbound innovations. I'd say you and what you have done with Saralane are both pretty impressive.
Post a Comment